The day before Thanksgiving found me debating the merits of sweet potatoes with the lovely young woman who manages Race's Farm stand. She prefers the sweet reds and I was going on about the Japanese white sweet potato, especially when roasted as oven fries. Arriving home I decided to put the two to the test. The result was not your usual sweet potato dish for Thanksgiving; I even threw in a parsnip to make things more interesting. Hey, I figured, why not take a walk on the wild side and toss the lot with a toasted walnut oil, a sprinkle of sea salt and roast them in the oven at 400 degrees. Once they emerged I could see they were just begging for some grated Peocorino Romano and that's just what they needed to tie the sweet with the savory.
As for which one tasted better, that is up to how you like your tators done. The reds are more tender and a bit more sweet than the Japanese, which is slightly more dry with just the right amount of sweetness. Together it was the perfect marriage and then that rogue parsnip shows up to distract your taste buds. With the leftovers I added a serving to a bowl of homemade Turkey Brown Rice soup and with a green leafy salad sighs of contentment rang through the house.
Sweet and Savory Sweet Potatoes
Serves 6-8
1 large Japanese white sweet potato
1 large sweet red potato
1 medium to large parsnip
1/4 cup toasted walnut oil
Sea salt to taste
Pecorino Romano cheese
1. Preheat oven to 400 degrees.
2. With a mandolin or by hand cut the sweet potatoes and parsnip into french fry shapes. Spread onto a baking sheet.
3. Pour the oil over the potatoes and toss with your hands or spatula to coat. Sprinkle with salt and place in the oven.
4. Roast for 40 minutes, stirring the potatoes at least once during the cooking time.
5. Remove from oven when done and place in a large bowl. Add the grated Romano and toss well to combine. Adjust salt if needed and serve warm.
Fall has arrived in the northeast and with it comes winter squash in all its glory. Nothing better than a roasted vegetable salad combined with nuts and greens, both raw and cooked. Simple and easy to make these kinds of salads can be made from dinner leftovers and just tossed with a mildly sweet vinaigrette. For this particular recipe I was inspired by the crisp Macoun apples, buttercup squash, fresh beets and their greens. Nothing like beet greens to move me to rapturous tears. Not sure what that says about me, but I just love the taste of fresh greens. I served it for the Transition Phase of the Body Rejuvenation Cleanse and everyone loved it. It is a great meal to take for lunch the next day.
The Buttercup Edamame Rice Salad was created for my recent Herbs and Spices cooking class. Even with the time it took to peel the buttercup squash it was worth the labor. Feel free to substitute butternut or another winter squash in either of these recipes. You can also cut your work time in half and buy frozen cubed winter squash and roast them instead. Opt for the organic brands to eliminate any chemicals from the recipe.
Butternut Apple Salad
Serves 6
2 cups Butternut squash, peeled and cubed
1 ½ cups fresh beets, peeled and cubed
1 firm crisp apple, cored and cubed
1 cup fennel bulb, cut into thin strips
2 cups beet greens, cooked and chopped
Boston Bibb lettuce or Arugula
Dressing
1/3 cup extra virgin olive oil
1/2 tsp. Ume Plum vinegar or sea salt
3 Tbs. golden balsamic vinegar
1 Tbs. maple syrup or pinch of stevia powder
1/4 cup whole almonds, toasted
1. Preheat oven to 375 degrees. Spray a baking pan with oil.
2. Toss butternut cubes and beets with 2 tablespoons of oil and arrange on pan. Bake until tender and slightly browned, about 30 minutes. Remove from oven when done and cool.
3. On a separate baking sheet toss the apple and fennel with 2 tablespoons of oil and arrange on pan. Bake until tender, about 20 minutes. Remove from oven when done and cool.
4. Whisk together the remaining oil with vinegar and maple syrup and set aside.
5. In a medium bowl combine the squash, beets, apple and fennel turning gently.
6. Place Boston Bibb lettuce or arugula on individual salad plates and spoon the salad over the greens. 7. Top with the dressing and toasted almonds and serve.
Edamame Buttercup Rice Salad
Serves 4
2 cups Edamame
2 cups Buttercup squash, peeled and cubed
1 ½ cups cooked brown rice
1/3 cup currents
1/4 cup toasted sesame seeds
1/4 cup sesame oil
2 Tbs. toasted sesame oil
1/2 tsp. Ume Plum vinegar or sea salt
3 Tbs. brown rice vinegar
¼ cup fresh parsley, minced
¼ cup fresh basil, minced
1. Preheat oven to 375 degrees. Spray a baking pan with oil.
2. Toss buttercup cubes with 2 tablespoons of sesame oil and arrange on pan. Bake until tender and slightly browned, about 30 minutes.
3. Meanwhile, bring a pot of water to water and cook frozen edamame until tender, about 5 minutes.
4. Whisk together the dressing ingredients and set aside.
5. In a medium bowl toss everything together with the dressing and serve on a bed of fresh Arugula.
What a great week of friends visiting from out of town bringing with them new ideas, recipes, inspiration and information. Laura and Linda arrived from Hawaii and California eating a fairly strict Macrobiotic diet as prescribed by Warren Kramer. Warren is a highly respected Macrobiotic counselor who travels the country teaching and counseling those fortunate enough to make his acquaintance. The ladies brought along recipes he had given them, that made their way into my Foods for Lung-Large Intestine cooking class and I happily share a few of them with you here.
The first one is a Mochi Vegetable Pancake, which I did not know you could make so easily. It turned out to be delicious, and to make the preparation go more quickly I used frozen organic vegetables and sauteed them with fresh onion and shitake mushrooms in sesame oil. I served a few toppings on the side such as a coriander chutney, some fresh pesto, and a simple dipping sauce of tamari, ginger juice, mirin and water.
For those of you wondering what foods support the Lung/Large Intestine you will have to wait for the workshop to come round again in the fall, however I will tell you that pungent taste and the color white are beneficial for these organs. Daikon radish, rice, and mochi are examples of supportive foods and to that end I have used them in these two recipes.
Mochi and Vegetable Pancake
Serves 2
Toasted sesame oil * 1/2 onion, thin half moons * 3 shitake mushrooms, sliced * 1 cup frozen mixed vegetables * ½ lb. plain mochi, coarsely grated * Umeboshi vinegar * sea salt * 2 tablespoons tamari * 1 tablespoon water * ½ teaspoon ginger juice * ½ teaspoon mirin
1. Heat a small amount of oil in a skillet. Sauté the onion for 2 minutes. Add the shitakes and a pinch of sea salt. Add the frozen vegetables and sauté another 2 minutes. Add enough water to coat the bottom of the skillet, cover, reduce the flame to low, and simmer 3-4 minutes, until vegetables are tender.
2. Remove the cover, sprinkle a few drops of umeboshi vinegar. Cook another minute or so. Remove the vegetables and place in a bowl.
3. In a heated cast-iron skillet, place about 1/8-1/4 cup of grated mochi. Place 1-2 tablespoons of sautéed vegetables. Next, sprinkle a little more grated mochi on top of the veggies to create a sandwich. Cook on each side until slightly golden. The mochi will melt, completely encasing the vegetables and puff up slightly. Remove and place on a serving platter.
4. In a small bowl combine the tamari, water, ginger and mirin. Spoon into dipping bowls and serve with the pancakes.
Boiled Daikon with Sweet Miso Sauce
Serves 2
1 daikon * ¼ cup rice syrup * 1/8 cup sweet miso * 1/8 cup tahini * chives
1. Cut daikon into large rounds (1/2” thick). Place daikon in a saucepan of boiling water for 7 minutes, until tender.
2. In a small saucepan heat the sweet miso and tahini, stirring well, then stir in the rice syrup.
3. Serve daikon on individual plates topped with a teaspoon of the tahini sauce. Garnish with the chives.
What a great time I had at the opening of the Blairstown Farmers Market yesterday. Set up in the Foodshed Alliance booth I featured 3 delicious recipes you can create with Garlic Scapes. Godelewsky Farms had plenty on hand to sell and once the crowd sampled the goods they were soon sold out.
The first recipe was a classic Basil-Parsley-Garlic Scape pesto using no nuts or cheese, just a good quality extra virgin olive oil, a dash of sea salt and the herbs take care of the flavor. I had cooked up a big pot of chickpeas to make a garlic scape bean spread and was not disappointed with the results. And finally, with some left over garlic scapes and a bunch of both cilantro and parsley, I whipped together another pesto that had the crowd rolling their eyes in sweet delight. With no further ado I offer you the recipes.
Garlic Scape Pesto
2 cups garlic scapes, chopped
2 large handfuls fresh parsley, washed and dried
2 cups fresh basil (lemon basil adds a nice touch)
1/2 tsp. sea salt
1/2 to 1 cup extra virgin olive oil
1. In a food processor chop the scapes into a fine mash.
2. Add a 1/4 cup of the oil and puree.
3. Add the parsley and pulse to combine.
4. Add the basil and pulse to combine, adding more oil as needed.
5. Add the sea salt and keep the machine running while you drizzle the oil in through the chute.
6. Stop from time to time to scrape down the sides then continue to puree until it is a smooth consistency.
A note on Garlic Scapes: these are the flowering stems that grow out of the garlic bulb. Some people call them garlic curls and they have a short season for enjoying. This makes them all the more precious and can be used in a stir-fry, dressings, to flavor oil, or to make into a pesto. They are aromatic and pungent at the same time, so no need to add extra garlic to kick the taste up a notch.
Garlic Scape Hummus served in a Romaine Lettuce Leaf
1/3 cup sliced garlic scapes (3 to 4)
1 tablespoon freshly squeezed lemon juice, more to taste
1 cup fresh parsley, washed and dried
1/2 teaspoon coarse sea salt, more to taste
1 can (15 ounces) Garbanzo beans, rinsed and drained (Any white bean will work.)
1/3 cup extra virgin olive oil, more for drizzling
1. In a food processor, process garlic scapes with lemon juice, parsley and salt until finely chopped. Add beans and process to a rough purée.
2. With motor running, slowly drizzle olive oil through feed tube and process until fairly smooth. Pulse in 2 or 3 tablespoons water, or more, until mixture is the consistency of a dip. Add more salt, pepper and/or lemon juice, if desired.
3. Spread out dip on a plate, drizzle with olive oil, and sprinkle with more salt if desired.
Cilantro Parsley Pesto
Yields 11/2 cups
4 garlic scapes, roughly chopped
4 cups cilantro, washed and dried. (Tops, but some stem is fine)
3 cups parsley, washed and dried. (Again, some stem is fine)
1/2 cup cooked chick peas
1/3 cup chick pea liquid
1/3-1/2 cup extra virgin olive oil
2 teaspoons white balsamic vinegar
1 teaspoon sea salt or to taste
1. In a food processor, process garlic scapes until finely chopped. Add cilantro, parsley and chickpeas and vinegar and process to a rough purée.
2. With motor running, slowly drizzle olive oil through feed tube and process until fairly smooth. Pulse in 2 or 3 tablespoons of the chickpea liquid, or more, until mixture is the consistency of a dip. 3. Spread out dip on a plate, drizzle with olive oil, and serve on chunks of whole grain country bread, or use a raw sugar snap pea and scoop up a mouthful.
In between bursts of chilly spring rain and hints of summer heat there have been moments of sublime warmth where I am moved to marry two of my favorite foods together. Sweet, tart apples and salty sea rich dulse. You may not think this is a marriage made in heaven, but we are not in heaven, but here with our feet planted, for some, firmly on the ground awaiting the next apple to fall from the trees.
Apples are a food gifted to us by the gods. They help to protect brain cells from free radical damage, while working to lower your bad cholesterol to tolerable levels. They are sited to help prevent a whole slew of cancers, plus they are sweet and delicious. Eat them fresh or cooked in dessert recipes the simple apple will serve you well.
On the other end of the spectrum you find the sea vegetable known as Dulse. High in potassium, iron, B6 and B12, dulse can be used in soups, fried to make chips or sprinkled on grains and salads in the form of dulse flakes. It is mild in taste and low in sodium. I love the Maine Coast Sea Vegetable Dulse that comes right out of the waters off the coast of Maine. This salad is a great way to introduce yourself to this nutritious vegetable. I hope you enjoy.
Waldorf Salad w/Dulse
Serves 6
1 head red leaf lettuce, chopped or broken into pieces
1/3 cup Dulse flakes
2 apples, cored and cut into chunks
3 grated carrots
1 cup chopped celery
1 cup red grapes, halved
1/4 cup minced red onion
1/2 cup chopped toasted walnuts
1/3 cup raisins or dried cranberries (optional)
Dressing:
1/4 cup extra virgin olive oil
2 tablespoons apple cider vinegar
1 teaspoon honey or agave syrup
½ teaspoon Ume Plum vinegar or sea salt
1 teaspoon Dijon mustard
½ teaspoon garlic powder
1. In a large salad bowl whisk together the dressing ingredients.
2. Add the salad ingredients and toss with the dressing.
3. Arrange on individual plates and serve.
Here is another delicious recipe from the last Macrobiotic cooking class and one of my favorite warm weather salads. It takes so little time to make that you will have no choice but to include this as a staple in your weekly menu planning. I love the complexity of sweet and sour flavors with the pungent bite of scallion and the cool crisp crunch of fresh cucumber.
Feel free to use your favorite vegetables in this salad, but replacing the tiny currents with raisins may be to much. On the other hand, dried cranberries would make a tart replacement and may as well throw in a few toasted pine nuts while you're at it.
Cous Cous Salad
Serves 6
2 cups organic couscous
2 cups water
1/3 cup currents
1 cup carrot, grated
1/2 cup cucumber, peeled, seeded and diced
3 green onions, diced
Lemon Dressing
Juice of 1 lemon (about 2 tablespoons)
Juice of 1 lime (about 2 tablespoons)
¼ cup extra virgin olive oil
1 teaspoon Ume Plum vinegar or 1/2 teaspoon fine sea salt
1 teaspoon sweetener of choice (I use a pinch of stevia powder)
2 tablespoons brown rice vinegar
1. Bring 2 cups water to a boil, add the couscous and stir. Cover and turn the flame off.
2. Allow the couscous to steam for 5 minutes. Remove and fluff with a fork to cool.
3. Add the currents while still warm and the other vegetables once cous cous has cooled.
4. Whisk together the dressing ingredients and toss with the cous cous. Let sit for 10 minutes to better absorb the flavors.
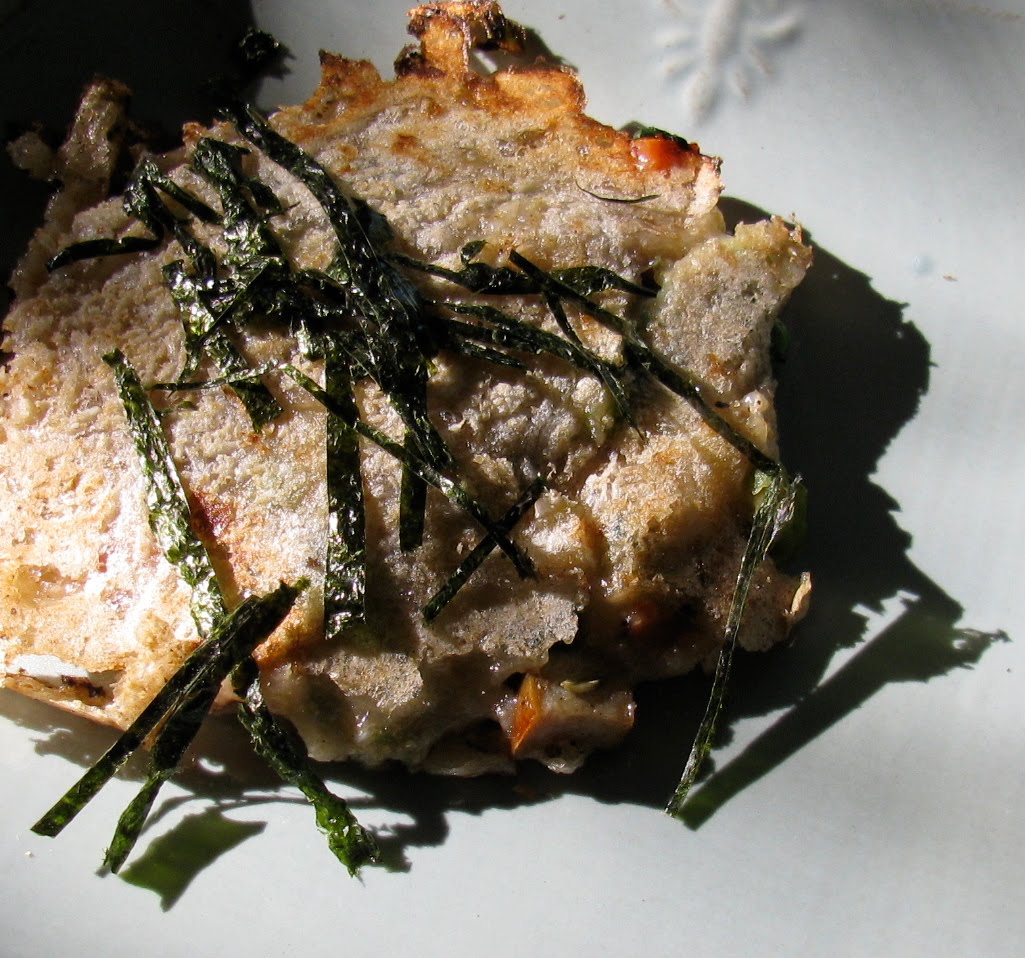
For this past Sunday's Macrobiotic cooking class I introduced yet another way to prepare the blood strengthening food known as Mochi. For years I have been pressing strips of mochi in a hot waffle iron or cutting it into tiny squares and baking them as croutons. I have to tell you however, that this pan-fried mochi is my favorite way to eat this simple food made from pounded sweet rice.
Here is the mochi just out of the package and before cooking. I toasted a sheet of nori by waving it over the gas flame, then tore it into strips to wrap around the nori once it was cooked. I love how crispy the outside of the nori gets with a soft chewy center. Ummm, ummm, so good, especially garnished with toasted black sesame seeds and chopped green onions. With a side of dipping sauce made from tamari and grated ginger this dish takes on the status of one of my favorites. Oh, yes and add some cultured vegetables on the side to support digestion and add some serious enzymes.
Pan Fried Mochi with Nori
Serves1
1 teaspoon sesame oil, toasted sesame oil or extra virgin olive oil
1. Place the oil in a cast iron or heavy skillet and heat. Add the mochi, reduce the flame to medium-low and cover. Cook 3 to 4 minutes. Flip over, cover and cook another 3 to 4 minutes or until the mochi puffs up.
2. Remove from the pan and wrap the nori around the mochi. Mix the tamari, water and ginger in a small dipping bowl. Dip the mochi in the dip sauce and eat while hot.
Spring time brings out my love for grain salads and what better than to tweek the traditional tabouli recipe and exchange cous cous with quinoa. I also added some cilantro along with the parsley and a few other spring vegetables I had in the fridge. Hope you enjoy!
QUINOA TABOULI
3 cups cooked quinoa
1 cucumber, peeled, seeded, diced
3 green onion, sliced thin on diagonal
¼ cup cilantro. minced
½ cup parsley, minced
4 asparagus, grilled, chopped (optional)
¼ cup diced fennel bulb (optional)
Dressing
¼ cup fresh lime juice
¼ cup extra virgin olive oil
2 teaspoons Ume Plum vinegar
pinch of stevia powder
Combine the quinoa, cucumber, onion, cilantro, parsley, asparagus, and fennel in a medium bowl. Whisk together the dressing ingredients and pour over the quinoa mixture stirring to combine. Let sit about 10 minutes before serving.
Great in a wrap with hummus or topping fresh greens for the perfect salad.
It was a beautiful spring morning, the chill of winter had gone leaving a lingering taste of rain soon to follow. Maya and Seamus took a look out the window and let me know it was time for our morning walk. So down the stairs we went and out the door after much conversation, on my part, as to which jacket to wear and, "Hey, you two, let me get my shoes on before you leave without me."
Which is pretty much how it happens until I can get their leash on and then off we go along the river and onto the country trail. The crocus and daffodils have popped up through the earth even knowing there might be another blast of snow before spring makes herself comfortable. I capture a moment here and there amazed at how it happens with such perfection year after year whether anyone notices or not.
As we arrived to the lake this morning I was taken aback by the change in little over a weeks time. Not so long ago ice covered half the lake. The ducks and swans followed the melting snow in search of new algae revealed more and more with each rise in temperature.
But today all the ice was gone and the sun hit the water like diamonds scattered across the surface. Graceful as, well, swans, they paid no notice to two wee pups and myself snapping a quick picture.
Which brings me to why I started this blog in the first place, and thank you for your patience. Upon arriving home I didn't want to eat too heavy before teaching yoga class, which did not stop Maya and Seamus from devouring their butternut and sardine breakfast. Instead I put together a smoothie with a few ingredients I don't normally use for this purpose and never in the morning. However it tasted great, settled well in my stomach and supported me through a long vinyasa flow class. Here I share the recipe with you to try.
Banana Pineapple Smoothie
Serves 1-2
16 ounces water
1/2 ripe banana
1 tablespoon flax meal
1 teaspoon psyllium powder
1 scoop protein powder (optional)
2 scoops Coconut Bliss, Coconut Pineapple non-dairy frozen dessert
Stevia or agave syrup to sweeten further
Combine ingredients in a blender and puree until smooth.
It makes a great milkshake without all the additions and for that you might use a soy/rice milk blend, banana, Coconut Bliss and any extra sweetener. A perfect way to introduce spring back into your life, not bad for those lazy, hazy days of summer either.
After a brisk morning walk watching the sun come up, my two pups and I were ready for a hearty breakfast upon arriving home. For Seamus, a wee, shorn Shih Tzu, and Maya a feisty, huntress Cairn terrier, I had made a special blend of canned pumpkin, red salmon, flax meal and garlic-yeast powder. To this I added some cooked spinach, which I had made for myself, plus a 1/8 cup of high end commercial dried dog food.
As they devoured their small bowls of food I added some leftover Basmati rice to the spinach, which absorbed the extra water while cooking. I then turned off the heat and mixed in a small teaspoon of Dandelion Leek miso (mmm, so good) and a couple of tablespoons of spicy Korean Kimchi. I topped the mixture with some toasted sesame seeds and a dollop of my favorite hummus and in 8 minutes I had a delicious breakfast. For me a meal like this will take me through the morning and into early afternoon satisfied and energized until time for lunch. Speaking of which....
Then for lunch, after another long walk over and back from my neighbor Suzanne, to help set up a whole chicken in her new crockpot. For that we stuffed sliced garlic under the skin, then poured olive oil and sea salt on top, naturally in moderation, and covered the top and sides with thinly sliced lemon. Sorry, no pictures as I forgot to bring my camera, but when me and the pups got home they had a good snack and I made a tuna wrap and served it with sweet potato fries. I include that recipe as well with pictures to inspire you.
That's Maya sticking here nose in and taking a sniff of the sweet potato chip. Snapped it and shuffled the temptation away before she took a bite. You can also serve the tuna salad in something a bit more glamorous for yourself or when guests come for lunch.
SPINACH RICE with MISO
Serves 1-2
1/3 cup frozen organic spinach
¼ cup water
½ cup cooked Basmati rice
1 small teaspoon Dandelion Leek miso or miso of your choice
2 heaping tablespoons spicy, Korean Kimchi (or what you can handle)
In a small saucepan combine the spinach with water and bring to a low simmer. Add the rice and cook until water is almost absorbed and rice is tender. Remove from the heat and dissolve the miso in the rice mixture. Stir in the Kimchi and pour into a bowl. Sprinkle with toasted sesame seeds and top with a dollop of hummus. Sit in front of the window as the sun warms your heart and breathe in gratitude for the bounty you are about to eat. May all sentient beings have food to eat and a warm place to rest their body.
TUNA SALAD WRAP
Serves 2
1 6 ounce can tuna in water, drained
½ teaspoon curry powder
1 teaspoon crunchy peanut butter
½ teaspoon mellow white miso
1 tablespoon plus 1 teaspoon Vegenaise
2 tablespoons currents
1 stalk celery, diced
2 spelt tortilla, warmed
2 leaves romaine lettuce, split in half down the center
In a small bowl combine the tuna, curry, peanut butter, miso, Vegenaise, currents, and celery. Mix well.
Place the warmed tortilla on a plate and scoop half the tuna salad on one end of each tortilla.
Lay the romaine leaf on top the tuna and roll up. Slice in half and serve.
You can also serve the tuna in a fancy wine or champagne glass and decorate with chips or colorful vegetables.
A classic Macrobiotic dish with a twist of ingredients. Usually made by cooking the aduki beans (Japanese red beans) with the butternut squash instead I made it more like a stew and cooked the beans separately, then cooked the hijiki sea vegetable with the squash and added the beans at the end. The dish came out to be a whole lot more delicious, not to mention nutritious and perfect for this cold winter season.
Here are some of the nutritious benefits you will receive from including these foods in your diet: Aduki beans are good for heart-small intestine, helps tonify your kidney-adrenal function, helps to detoxify the body and reduce swelling. Butternut Squash provides a rich sweet flavor and is good for the stomach-spleen-pancreas group of organs. Hijiki is an excellent form of calcium, iron and iodine. It helps to detoxify the body and softens hard masses in the body. Good for the thyroid gland and helps to normalize blood sugar levels.
This dish takes about 40 minutes to make and enough for about 4-6 people depending on their appetite.
Aduki Beans, Butternut and Hijiki
1 cup aduki beans, soaked overnight
½ butternut squash, peeled and cubed
¼ cup dried hijiki, soaked
1/2 onion, chopped
1 tablespoon minced ginger
2 tablespoons sesame oil
1 teaspoon toasted sesame oil
1 tablespoon tamari soy sauce
toasted sesame seeds
1. In a medium saucepan cook the aduki beans in water until just tender. Meanwhile, cube the squash and soak the hijiki.
2. In a large skillet sauté the onion and ginger in the sesame oil until onion is tender, about 3 minutes. Add the squash, hijiki and tamari stirring to coat with oil.
3. Add water just to cover, then cover pan with lid, reduce heat and simmer until squash is tender, about 15-20 minutes.
4. Stir in the beans and cook another few minutes. Serve topped with a sprinkling of sesame seeds.
Coming upon a May, 2009 Martha Stewart magazine I happened to find a recipe for Ukranian Borscht. Upon closer look the recipe called for short ribs, tomato paste and dry white wine. Planning to use this recipe for an upcoming Body Rejuvenation Cleanse session I did a quick recipe re-do and created this vegetarian version that won serious kudos from my students.
By simply bringing the peeled beets to a boil and letting them soften in the hot water you will have a delicious broth that can be made the night before or early in the day and left to cool on the stove. The lemon and vinegar gives the soup a nice tang, which complements the sweetness of the beets, carrots and cabbage. A perfect choice for those times when sweet cravings are overwhelming. Instead have a warm cup of soup. If you are not cleansing, and so inclined, add a dollop of plain sheep's yogurt to your final creation than a sprinkle of parsley and you've created a work of art.
Winter Beet Borscht
Serves 6 to 8.
2 large beets, scrubbed well, trimmed and peeled
8 cups water
3 tablespoons extra-virgin olive oil
2 medium onions, chopped
4 garlic cloves, minced
2 stalks celery, chopped
2 medium carrots, chopped
3 cups Chinese cabbage, chopped
juice of 1 lemon
3 tablespoons apple cider vinegar
2 tablespoons chopped parsley, for garnish
1.Place the peeled beets in a large, heavy saucepan filled with the water. Bring to a boil, cover, turn off heat and let sit until cool. Remove beets from water and grate on a box grater, set aside. (This can be done ahead of time or even day before)
2. Bring the beet cooking water to a boil and add the carrots and cabbage, reduce heat and simmer.
3. Meanwhile, in a medium skillet sauté the onion, garlic and celery in oil until tender, about 3 minutes. When done, add to the soup, making sure to wash out the skillet with beet stock and return to the soup mixture.
4. Cook for 20 minutes or until vegetables are tender, than add the grated beets, lemon juice and vinegar. Salt and pepper to taste. Simmer another 10-15 minutes before serving garnished with chopped parsley.
Found myself with a spelt pizza crust from Berlin Bakery, a big bunch of fresh broccoli rabe and a bag of pecans, so I made this delicious pizza, vegan version. You can always grate some Romano cheese over the top once it is out of the oven or throw some crumbled goats milk feta on top before baking. Both additions would compliment the flavors of this dish.
Serve with a salad of baby arugula, sprouted fresh lentils, avocado and a sharp golden balsamic vinaigrette. Nothing speaks love like feeding yourself and others great food.
Broccoli Rabe Pizza
Serves 8
1 Berlin Bakery Spelt pizza crust
1 bunch broccoli rabe, ends trimmed and leaves washed
3 cloves garlic, minced
1 onion, chopped
2 tablespoons plus 1 teaspoon extra virgin olive oil
1 tablespoon of Braggs Aminos or sea salt to taste
1/3 cup pecans, chopped
1. Pre-heat oven to 425 F.
2. Pour a half inch of water into a large skillet and place the broccoli rabe in the skillet.
Cover and simmer until tender, about 7- 10 minutes. Drain in a colander and run under cool water to stop the cooking. Squeeze liquid from rabe, set on a cutting board and chop.
3. Meanwhile, heat 2 tablespoons of the oil in the skillet and saute the onion and garlic until tender, about 3 minutes. Turn off the heat and toss in the rabe, mixing well to combine the flavors. Add the Braggs Aminos or salt to taste,
4. Distribute the remaining oil around the top of the pizza crust especially around the outer edges. Place the rabe on top the crust and finally the pecans.
5. Bake for 12 minutes or until crust is crisp and edges browned.
Two Cleanse sessions back to back on Saturday and Sunday. Everyone returned from two weeks on the Transition Phase with stories to tell and color beginning to return to their winter cheeks. A lot of cooking for me, and I am always trying new recipes to introduce sea vegetables into peoples diet. I know it takes time to try new foods, but when you know how beneficial they are you are motivated to explore them in recipes.
You’ve probably seen nori at sushi restaurants, and it’s just one of a variety of sea vegetables that can enhance the flavor of your favorite foods and boost your thyroid function. Sea vegetables should be at the top of your list for feeding your thyroid. They contain iodine and have high levels of trace minerals, vitamins, healthy proteins and fats. Our soils are depleted of minerals, plus we drink coffee, soft drinks and alcohol, live under constant stress, and eat refined, acidic foods, which only make sea vegetables such as: arame, dulse, hijiki, wakame, nori and kombu a MUST in your weekly menu plan. The Japanese eat some at every meal and we would be wise to follow them.
So, for the introduction meal to the Cleanse Phase of the Body Rejuvenation Cleanse, I cooked up some spicy lentils (which I have previously posted this recipe), a pressed salad and this delicious combination of tastes using cabbage and arame blended with fennel seeds and curry. The sweetness of the cabbage balances the pungency of the spice and served alone the next day it was even better.
Curried Cabbage and Arame
2 tablespoons coconut or Grapeseed oil
1 onion, chopped
3 cloves garlic, diced
1" piece fresh ginger, peeled and diced
1 tablespoon fennel seeds
1 teaspoon curry powder
2 tablespoons dried Arame, soaked for 10 minutes and drained
1. In a large skillet heat the oil over medium high and sauté the onion and ginger until tender, about 3 minutes.
2. Add the garlic and fennel seeds and cook another few minutes or until fennel begins to brown. Add the curry powder, stirring well to coat the onion, then reduce heat to a simmer, cover and let cook while you arrange the Arame and cabbage.
3. Remove lid and add the Arame stirring well to combine. Add the chopped cabbage and stir well.
Pour in the water and stir to remove any curry residue on the bottom of the pan. Stir in coconut cream and more water if needed, salt to taste, then cover and allow to simmer until cabbage is tender, about 15 minutes.
4. Serve on individual plates and garnish with fresh chopped cilantro and pumpkin seeds.
Winter is the time to store energy and strengthen reserves. The floating energy of Water symbolizes winter. The kidneys control the mineral/salt-water balance in the body. Salt is the essential taste for winter cooking. The minerals not excreted are concentrated in the blood. This mineralized blood is condensed into bone marrow, which serves as a reservoir when more blood is needed. In this way the kidneys nourish the bones. Foods to nourish kidneys include: buckwheat, adzuki beans, sea salt, miso, tamari soy sauce, and sea vegetables.
Excerpted from Cooking For Regeneration, by Cecile Tovah Levin
For a recent Macrobiotic cooking class I made a pressed salad. For this method you are actually cooking the vegetables with salt, pressure and time, and to do so you can use a Japanese pickle press (visit the StillPoint Schoolhouse store) or layer all the ingredients in a bowl and apply a weight, such as a large can or jar of beans, as pressure. Either way the results yield a crisp, crunchy, delicious salad.
The dressing you use can be salty and pungent as with the Wasabi Dressing or sweet and sour as the more traditional Honey Mustard Dressing demonstrates. However, one of the best things about a pressed salad is that it needs no dressing to taste great. Make enough salad for a few meals plus both dressings so you can change the taste for lunch the next day. Serve with a hearty bowl of winter stew and a warm cup of Kukicha tea.
Winter Pressed Salad
2 broccoli stalks, peeled, sliced into thin rounds
2 celery stalks, sliced thin
¼ red onion, sliced thin half moons
¼ Granny Smith apple, sliced thin
1 small head Romaine lettuce, washed and sliced thin
2-3 leaves of radicchio, washed and sliced thin
½ avocado, sliced thin
Toasted black sesame seeds
Sesame dressing or Honey mustard dressing.
Wasabi Dressing: 2 Tablespoons wasabior to taste * 2 Tablespoons Mirin* 2 Tablespoons tamari soy sauce * 2 Tablespoons Brown Rice Vinegar * 2 Tablespoons Extra Virgin Olive Oil or Sesame Oil * a pinch of Sea Salt * toasted sesame seeds to decorate
Honey Mustard Dressing: 2 tablespoons extra virgin olive oil * 2 teaspoons Dijon mustard * 1 teaspoon agave or rice syrup * 2 tablespoons golden balsamic vinegar * few drops of Ume Plum vinegar
1. Place all vegetables, except avocado, in a stainless steel or glass-mixing bowl. Add the salt and mix well.
2. Place a plate over the vegetables and press down or use a Japanese pickle press. Weight the plate with a 2-pound can, jug of water or other heavy object.
3. Press vegetables for 1 hour. Remove plate, and squeeze out excess liquid. If the salad is too salty, rinse with cool water and dry thoroughly. Toss with dressing and serve.
Thinking of strong protein meals that support your weight loss and cleansing programs I put on the soundtrack to Mama Mia, turned it up high, my dancing shoes tied on tight and managed a few fancy moves while I prepped and prepared these two recipes. Maybe it was the dancing or just the fact that the recipes are good, because the lentils turned out to be some of the best I have ever made, possibly ever tasted; and the Lima Bean soup was a wonder to behold.
For the meal I paired the lentil soup with a fresh green salad of red leaf lettuce, dandelion greens, red clover sprouts, and blanched broccoli, topped with minced parsley, green onion and a tart dressing of fresh lemon juice, olive oil and minced garlic. A great liver cleansing salad.
The Lima Bean soup is very simple to make once you have soaked the beans overnight. You literally place half a peeled onion into the pot with beans and water/stock (no need to chop it) and a whole head of garlic, first layer of skin removed and washed well. The garlic cooks in its skin and when the beans are tender you remove the garlic to cool before slicing off the end and squeezing out the treasures within.
Serve the lentils over a bed of red and white quinoa, with a sprinkle of fresh cilantro. It was a meal that put a smile on my face with enough protein to satisfy my daily allotment.
I post the two recipes here for your enjoyment. As always pass the word around to your friends and family so they can experience some delicious, healthy food as well. Probably the best gift you will ever give them, this promise of good health and happiness.
Spicy Winter Lentils
Yield: 6-8 servings
2 cups French lentils, rinsed
4 cups water
2 carrots, chopped
2 stalks celery, chopped
1 tablespoon vegetable or coconut oil
1/2 onion, chopped
1 red pepper, ceded and chopped
3 clove garlic, minced
2” piece ginger, peeled and minced
1 red chili or cayenne pepper, minced
2 teaspoons cumin seeds
2 teaspoons coriander seeds
1 teaspoon fennel seed
salt to taste
Fresh cilantro minced
1. Combine lentils, water, carrots and celery in a soup pot and bring to a boil.
2. Remove from heat and spoon into a crock pot set to HIGH.
3. Meanwhile, roast the cumin, coriander and fennel seeds in a small skillet.
4. Remove from heat when they release their aroma. Place in a mort and pestle and grind to a powder.
5. In a medium skillet heat the coconut oil and sauté the onion, pepper, ginger, chili pepper and garlic until tender, about 3-4 minutes.
6. Add the ground seeds, stir well, and cook another 3 minutes.
7. Remove from heat and stir onion mixture into the lentils. Pour ¼ cup of water into the skillet and dissolve any remaining herbs and oil. Pour this water into the lentils.
8. Cover the lentils, reduce the heat to LOW, and cook for 4 hours. 15 minutes before serving adjust seasonings and salt to taste.
9. Serve topped with minced cilantro and a dollop of fresh yogurt if desired.
Lima Bean Soup
Yield: 6 servings
2 cups dried lima beans
1 cup vegetable stock
4 cups water
1/2 onion
1 whole head garlic (one layer of skin removed)
3 tablespoons fresh parsley
2 tablespoons minced green onion
1 teaspoon toasted pumpkin seeds per bowl
Sprinkle of cayenne (optional)
Salt and pepper to taste
1. Soak the beans overnight in a medium size soup pot or Dutch oven. Drain the water and add the stock and fresh water to the beans.
2. Add the whole ½ onion and the head of garlic to the beans.
3. Bring to a boil, reduce heat, partially cover and simmer until beans are tender, about 1 hour. (You can also bring to a boil, then pour into a crock pot set on LOW. Cover and cook about 4-5 hours)
4. When beans are tender remove the head of garlic and allow to cool. When cool enough to handle squeeze the garlic out of the casings and back into the soup. Discard the skin and casings.
5. Using a hand blender, purée the soup until tender. Salt and pepper to taste.
7. Serve topped with the minced parsley, pumpkin seeds and green onion.